
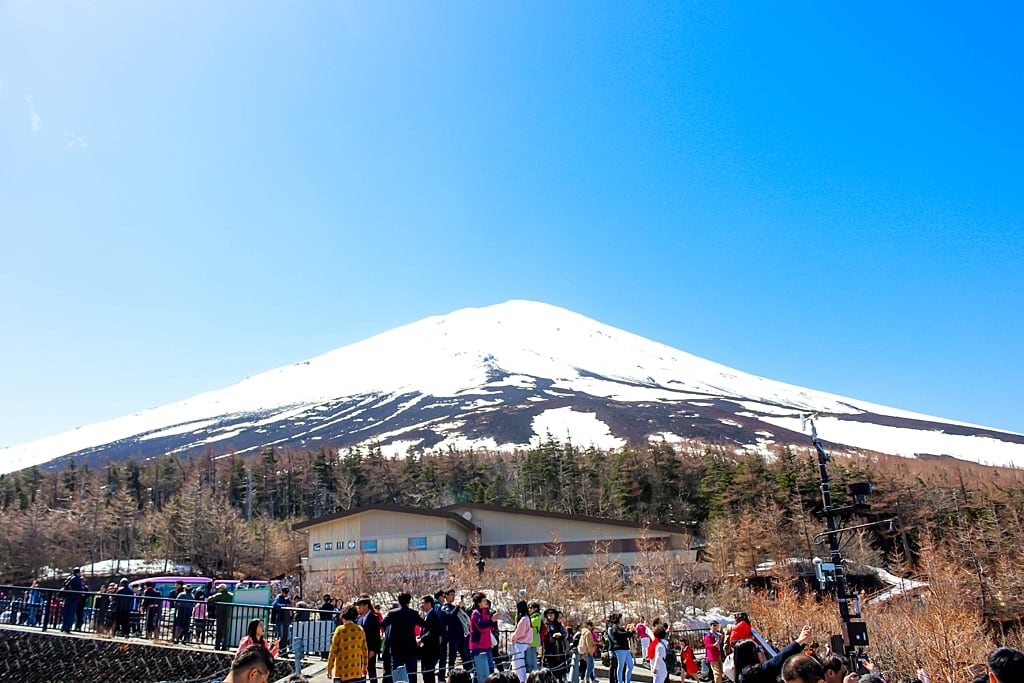
Reaching the summit, watching the magical golden sunrise, and eating a delicious bowl of ramen noodles on top is the most rewarding part of climbing Mt. Fuji or Fujisan as the Japanese call it. Those are just a few reasons why climbing Fujisan is a must for adventurous travelers.
And those who have climbed her will tell you, that it’s the highlight of their experience in Japan. So, if you’re joining a guided tour or climbing solo, our article is all about making sure your climb is a safe and unforgettable one.
If you’re joining a guided Mt. Fuji climbing tour, we have compared the top three (3) tour operators based in Japan to help you determine the best experience for you. You’re not just climbing the highest volcano and highest peak in Japan, you’re also climbing an iconic cultural symbol, a UNESCO Culture Heritage Site, and a highly respected volcano in Japan.
So you don’t just go there and climb thinking that it’s going to be just another normal hiking activity. In fact, you need to know a lot of things about climbing Fuji-san.
Not ready to climb Mt. Fuji yet? Click here to join a day tour to Mt. Fuji instead.
Climb independently or join a group tour?
It really depends on your individual travel circumstances:
1. If you’re traveling solo and/or it’s your first time climbing Mt. Fuji.
Then join a guided tour. Joining a group or private Mt. Fuji climbing tour through a licensed agency is the best way to experience it. Not only will you be in the safe hands of an experienced climber, but you’ll also enjoy the service of Japanese tour guides and English interpreters who are experts about Mt. Fuji and can tell you facts, history and stories, and their own experiences.
Honestly, climbing as a group is just more fun. Whether that group is you and your friends or a tour group doesn’t really matter in the end. The camaraderie and extra motivation can really help the last stretch of the mountain.
NOTE: DO NOT attempt to climb Mt. Fuji alone.
2. If group climbing tours don’t align with your schedule.
Then arranging a private tour is a great option. You have the freedom to choose your own climbing dates or even arrange a special experience after climbing Mt. Fuji.
3. If you live close to Mt. Fuji and you drive a car.
Then climbing independently makes a lot more sense. Driving on your own may be cheaper especially if you’re with your friends. However, you need to do some research about the deets of the climb such as where to park your car during peak season, Mt. Fuji rules and regulations, which trails you plan on starting your climbing, and safety briefs on your own.
Note that, if you’re driving your own car, the 5th Station is closed and cannot be accessed during peak dates (see here). So you need to park in Fujihokuroku Parking and take the shuttle bus to the 5th Station.
When are the best dates to climb Mt. Fuji?
The official Mt. Fuji climbing season is in the summer from July 1 to September 10. During this time the various facilities along the main trails are open, transportation to and from the mountain is easy and accessible, and the trails themselves are safest to hike due to the relative lack of snow.
If you’re an inexperienced hiker then this is the best time to tackle the mountain. But pay close attention to the Japanese holidays.
What are the dates to avoid?
Avoid climbing during Yama no hi (Mountain Day) which is a non-working Japanese holiday on August 10-11, 2020, during which seemingly every local is outside and climbing the mountains! If climbing on those dates is your only option, expect to queue from 9th station going up or down the mountain.
Avoid the Obon and Tanabata Festivals as well. While technically not a holiday’s but Buddhist celebrations which take place every 15th of the 7th lunar month and July 7th respectively. Obon lasts for 3 days (August 13-15, 2020) and are the busiest days.
So try to time your climb before those mentioned holidays.
Is climbing Mt. Fuji tough?
There is a famous Japanese proverb that translates into something like:
“He who climbs Mt. Fuji once is a wise man; he who climbs twice is a fool.”
The climb can be a bit difficult. But much of its difficulty lies in the mind rather than the actual trail. This isn’t to say there aren’t some rough spots along the path to the summit. Nor are we saying that you should jump off your couch directly into a Fuji climb.
We’ve seen some very fit people start out strong racing to the top only to be passed by little old ladies at the halfway mark. So the motto to remember here is slow and steady wins the race.
You may have seen other bloggers and vloggers climbing Mt. Fuji wearing only tank tops, shorts, and sneakers. Don’t do this. Mt. Fuji has been responsible for countless injuries and even a few deaths over the years.
Most of these injuries can be attributed to people simply being underprepared, and much of this is the result of peer pressure of those pushed to climb it. So if you aren’t both mentally and physically ready to climb it, then don’t attempt it until you are.
The weather around Mt. Fuji also changes in a heartbeat and can be misjudged even by the most accurate weather channels. So be prepared for sudden weather changes such as rainstorms or windstorms. We’ll discuss the proper equipment to bring in the next section to be better prepared for this.
As you ascend, the air starts to thin out as there’s an elevation gain of 1,500 meters above sea level from the 5th Station to the summit. A sudden elevation gain like that can challenge your mental and physical fitness and can make your entire hike difficult as you gasp for more air.
Most climbers back out once they reach 8th station as this is where they start to show altitude sickness. Canned oxygen can be bought at almost every station to help combat this.
This section may seem like a lot of doom and gloom regarding the difficulty of the climb, but it’s all for your own safety. We certainly don’t want to give you a false impression of it being easy. But, as long as you’re in moderate physical condition, then you should be good to go.
As we mentioned, much of the climb comes down to being well prepared and mental fortitude. Trust us, by the 8th station, your mind will be screaming for you to give up. But stick it out and the reward is absolutely worth every bit of soreness that comes with it!
How long does it take to climb Mt. Fuji?
Note that these are just an approximate for an average person and should not be followed as a guideline. Avoid “bullet climbing” or climbing without resting just to meet minimum hours of climbing.
Climbing Mt. Fuji is not a race.
Here’s the summary of ascending and descending times of each trail:
- Yoshida Trail: 6-7 hours ascend and 4-5 hours descend.
- Fujinomiya Trail: 5-6 hours ascend and 3-4 hours descend.
- Subashiri Trail: 6-7 hours ascend and 3-4 hours descend.
- Gotemba Trail: 7-8 hours ascend and 3-4 hours descend.
Compare Mount Fuji Climbing Tours in Japan
| Willer Express | Club Get | JTB | |
|---|---|---|---|
| Trail | Yoshida trail | Choose between Yoshida trail or Subashiri trail | Yoshida trail |
| Hut stay | Tomoe-kan 8th station | Varies | Toyo-kan 7th station |
| Check Price Here | Check Price Here | Check Price Here |
|
| Round trip bus transfer | ✔ | ✔ | ✔ |
| Meals | ✔ | ✔ | ✔ |
| English-speaking licensed tour guide | ✔ | ✔ | ✔ |
| Insurance | ✔ | ✘ | ✘ |
| Sunrise viewing* | ✔ | ✔ | ✔ |
| Hoei crater visit | ✘ | Optional | ✘ |
| Gear rental | Optional | Optional | ✘ |
| Bonuses | -Mineral water -Discount coupons | -Mineral water -Discount coupons | -Lake Kawaguchi visit -Onsen (hot spring)experience |
| Check Price Here | Check Price Here | Check Price Here |
NOTE: *Sunrise visibility depends on the weather
1. Best Budget Mount Fuji Climbing Tour
→ UPDATE: Currently unavailable.
Willer Express is one of the most popular highway bus companies in Japan. Their basic Mt. Fuji Climbing group tour package with no gear rental starts at US$200 which meets at the Fuji Subaru Line 5th station. Or for US$250 if you’d like to be picked up near Shinjuku Station in Tokyo.
All of their packages include:
- Round trip bus transfer from Shinjuku or meet-up at Fuji Subaru Line 5th Station.
- Stay at Tomoekan mountain hut at 8th station.
- Dinner and breakfast meals.
- English-speaking professional licensed tour guide.
- Traveler’s insurance.
2. Best Customizable Mount Fuji Climbing Tour
This tour is conducted by Club Get. Club Get doesn’t have an English website so this tour can only be booked through Voyagin. Voyagin is an online travel agency based in Tokyo specializing in local experience.
The best thing about booking your climb with them is that the tour is highly customizable. You can choose between Yoshida Trail and Subashiri Trail (read about their differences later).
You also have an option to include a one-of-a-kind experience to see the magnificent Hoei crater. The price also includes a lot of free stuff or bonuses.
Their Mt. Fuji climbing tour highlight and inclusion:
- Round trip bus transfer from Shinjuku Station
- A mountain hut stays at Mt. Fuji 7th or 8th Station.
- Dinner and breakfast meals
- The professional licensed tour guide can speak basic English.
- A ¥100 coupon for Mt. Fuji pilgrim staff.
- A special lucky charm and/or free mineral water.
- Option for gear rental during the checkout process.
- Choose between Yoshida Trail and Subashiri Trail.
3. “Luxurious” Mount Fuji Climbing Tour
This is not to say that the first two tours are not quality experiences. But this tour company looks to make your ascent comfortable from beginning to end.
And this all starts with reservations at Toyo-Kan Mountain Hut, at the 7th station, which is the most high-end hut in Mt. Fuji (read more about Toyo-Kan later) and allows you to rest and be fully prepared for the last stretch to witness the glorious Mt. Fuji sunrise.
After your long and arduous journey up and down Fuji-san, JTB’s Mt Fuji Climbing tour package provides you with an incredibly relaxing and soothing onsen (hot spring) experience in Lake Yamanaka — Beni Fuji No Yu Hot Spa, the only spa that offers the best views of Mt. Fuji while you’re soaked in their therapeutic waters.
Seriously, this will feel like the best bath of your life after the climb. I’ve been to Beni Fuji No Yu twice and have always enjoyed the experience, so I highly recommend it.
If you’re curious what a high-end mountain hut looked like and want a ‘better’ stay, then you’ll want to book with JTB. JTB is actually the largest travel agency in Japan and known for providing top-notch tourism experience for its customers.
So these guys know exactly how to please their guests.
Mt. Fuji Climbing Routes: Which trail should you climb?
This section is to help you learn about the four trails which lead to the peak of Mt. Fuji.
Each trail is color-coded on Mt. Fuji to help hikers follow the trail and not wander off course by mistake.
1. Yoshida Trail.
Yoshida Trail at glance:
- The trail begins at Fuji Subaru Line 5th Station in Yamanashi Prefecture at 2,300 meters altitude.
- Yellow trail.
- Zigzagging switchback trail.
- There are many mountains huts to rest and stop on the ascending trail.
- Separate ascending and descending trails.
- No mountain huts on the descending trail and there’s only one toilet on the 7th station. The next toilet is 30 minutes away from the 6th station.
- First-aid centers at 7th and 8th stations.
- Sunrise side of Mt. Fuji.
Yoshida is the most popular hiking trail and is typically overrun by tourists and locals alike with the last record of over 172,000 climbers last 2017. Yoshida Trail is color-coded with yellow. Yoshida trail is very visible from afar on a clear day due to its zigzagging switchback trail.
The descent also forks at certain points into different trails, so make sure you’re paying attention to the trail color code and not taking a wrong turn to end up on the wrong side of the mountain as a former coworker of mine did (causing his group to wait for 2 extra hours for him to find his way back).
Most travel agencies climb the Yoshida trail as it’s slightly easier for beginners due to many shops to stop at. We recommend booking with Voyagin or Veltra to experience climbing Mt. Fuji on the Yoshida Trail.
2. Fujinomiya Trail.
Fujinomiya Trail at glance:
- The trail begins at Fujinomiya Trail 5th Station in Shizuoka Prefecture at 2,400 meters altitude.
- Blue trail.
- The trail is steep and rocky.
- The shortest trail to the summit.
- There are many mountain huts.
- Same ascending and descending trail.
- Only 1 first-aid center at the 8th station.
- Not on the sunrise side.
Fujinomiya trail is the second most popular trail and it has the shortest route to the summit as the trail begins at an altitude of 2,400 meters. However, the route is steep and rocky. The ascending trail is the same as the descending trail, so climbers need to keep in mind of making way for each other.
3. Subashiri Trail.
Subashiri Trail at a glance:
- The trail begins at Subashiri 5th Station in Shizuoka Prefecture at 2,000 meters altitude.
- Red trail.
- Forested and shaded trail during the first hour of the hike.
- Known for its volcanic sand and gravel section on the descending trail called “Sunabashiri”.
- Separate ascending and descending trails.
- The ascending trail gets crowded from the 8th station as it joins the Yoshida trail.
- There are many mountain huts.
- Only 1 first-aid center at the 8th station.
- Sunrise side of Mt. Fuji.
The trail starts from Subashiri Trail 5th Station in Shizuoka Prefecture at an altitude of 2,000 meters. The Subashiri Trail is perhaps a local favorite or an avid hiker favorite. People who climbed Mt. Fuji many times choose Subashiri because it’s less crowded and provides an experience that isn’t present on the other trails.
The first half of the climb is tree-shaded by a lovely lush forest and it’s the only trail that directly faces the east which provides excellent sunrise experience.
For first-timers, be aware that it Subashiri trail merges with the Yoshida trail upon reaching the 8th station. So when descending, follow the red-coded trail which is a different trail from the ascend. If you’re interested in climbing Subashiri Trail, we recommend Voyagin as they offer a private climbing tour.
4. Gotemba Trail.
Gotemba trail at a glance:
- The trail begins at Gotemba 5th Station in Shizuoka Prefecture at 1,450 meters altitude.
- Green trail.
- The longest trail to the summit.
- Very few mountain huts and toilet is on the 7th station only.
- Known for having access to the beautiful view of Hoei Crater, a parasite crater of Mt. Fuji.
- Not on the sunrise side.
Gotemba trail is the least popular climbing routes. This is the longest trail out of the four trails and with fewer facilities for restrooms, no emergency facilities, and only 4 mountain huts for stops on the 7th station. For this reason, only experienced hikers are recommended to take this route.
On the brighter side, since this is the least popular, it is the least crowded of the four trails so you can enjoy it the climb quietly. Due to the very limited number of facilities on this trail, there are no available climbing tours. Therefore, you’ll have to do it on your own or arrange a private climbing tour.
What is the best mountain hut to rest or stay in Mt. Fuji?
The advantage of joining a group tour or a private tour is that hut reservations have already been taken care of by your local tour operator. If you’re planning on your own climb then you’ll have to make your own hut reservations and be prepared to deal with language barriers or limited English ability by the hut staff.
Toyo-Kan Inn. Located on the 7th station of Yoshida Trail, Toyo-Kan is like the 5-star hotel of all huts in Mt. Fuji; which, admittedly, isn’t a very high bar to clear. It’s the most modern mountain hut in Mt. Fuji that offers two room types. Rooms start at ¥10,000 and com with delicious breakfast and dinner meals.
Toyo-Kan is the only mountain that has a professional website where foreign guests can book conveniently. Due to its popularity, it is best that you book 1-2 weeks before your planned climb or join this Mt. Fuji climbing tour as they stay at Toyo-Kan hut.
For a list of mountain huts, here’s the website: http://www17.plala.or.jp/climb_fujiyama/mountain_huts.html
| Willer Express | Club Get | JTB | |
|---|---|---|---|
| Trail | Yoshida trail | Choose between Yoshida trail or Subashiri trail | Yoshida trail |
| Hut stay | Tomoe-kan 8th station | Varies | Toyo-kan 7th station |
| Check Price Here | Check Price Here | Check Price Here |
|
| Round trip bus transfer | ✔ | ✔ | ✔ |
| Meals | ✔ | ✔ | ✔ |
| English-speaking licensed tour guide | ✔ | ✔ | ✔ |
| Insurance | ✔ | ✘ | ✘ |
| Sunrise viewing* | ✔ | ✔ | ✔ |
| Hoei crater visit | ✘ | Optional | ✘ |
| Gear rental | Optional | Optional | ✘ |
| Bonuses | -Mineral water -Discount coupons | -Mineral water -Discount coupons | -Lake Kawaguchi visit -Onsen (hot spring)experience |
| Check Price Here | Check Price Here | Check Price Here |
Mt. Fuji Hiking Essentials and Equipment
1. What to wear for climbing Mt. Fuji
- Hiking undershirt. Ideally, 100% polyester such as this for you stays dry. Undershirts like Under Armor and compression shorts are great as they prevent chafing and wick sweat away from your body while maintaining flexibility.
- Quick-drying shirt. I love my hiking shirt from Columbia. It’s comfortable, cool, very lightweight, and has UV protection. Consider a hiking shirt that’s polyester with lightweight fleece.
- Gore-tex Shell Jacket. The weather in Mt. Fuji changes quickly in a heartbeat. It may say it’s sunny on the weather forecast on the day of your climb, but it’s actually raining in Mt. Fuji itself. Bring a shell jacket designed for rain and sudden change ice condition. An excellent shell jacket for Mt. Fuji climbing should be waterproof, windproof, and can withstand sudden extreme alpine conditions — the temperature drops on the summit of Mt. Fuji. And Gore-Tex material can withstand all those conditions. Think of it as an all-in-one jacket.
- Hiking pants. Again, I love Columbia’s hiking pants, and I have their Anytime Outdoor pants which are lightweight, water-resistant, quick-drying, and stretchable, and very comfortable.
- Hiking boots. It should be waterproof with mid or high ankle support. Don’t attempt to hike in water shoes or sneakers. I use this one.
- Thick hiking socks. Preferably wool because it can absorb sweat, keeps your feet warm, and doesn’t stink too much.
- Gloves. It can get very cold once you’re nearing the top so you need gloves. It also protects you from rocks as you climb.
- Lightweight rain gear (raincoat and pants). Always assume it’s going to rain. If it doesn’t, great. If it does, you’ll be prepared. It’s a win-win. You can buy this at any Don Quijote or ¥100 stores.
What not to wear
- Cotton shirts
- Jeans
- Shorts
- Aqua shoes or Sneakers
2. Hiking equipment:
- Backpack with built-in rain cover. Bring a backpack with at least 25L capacity to hold your necessities.
- Headlamp. A headlamp is mandatory in climbing Mt. Fuji as the sun will often set during your decent. Bring a headlamp instead of a flashlight.
- Hiking sticks. Some may not need this but hiking sticks make a huge difference in providing less pressure on your knees.
3. Mt. Fuji hiking essentials:
- Portable oxygen can. Oxygen can prove to be the most useful equipment when climbing Mt. Fuji and the one that you should use to combat altitude sickness and air gasping. You can buy oxygen can ahead in any Don Quijote or any convenience stores in Japan for about ¥500 – 700.
- Sunscreen. Preferably, with at least 50++ UPF with UVA and UVB protection.
- Lip balm. I always use Vaseline petroleum jelly for my lips as it is more effective than chapstick or any other medicated lip balm.
- Sunglasses. A pair of sunglasses can protect your eyes from dust or sand. It also protects your eyes from UV rays.
- 2-liter water. Each person needs to bring at least 2 liters of water and it can be refilled from mountain huts. You pay ¥500 for each refill.
- Food and snacks. Climbing Mt. Fuji is not the right time to restrict your diet as it a very strenuous activity. You can burn around 7,000 calories so you need to replenish your body with high-energy snacks and bars ideally high in fats.
- Cash. Your credit cards are no use here. Bring at least ¥10,000 cash including several ¥100 coins for using the toilet (¥200 as a donation), buying ramen noodles or Japanese curry, and refilling your water bottle. If you’re getting your pilgrim staff stamped, add another ¥5,000 as each stamp costs ¥300-¥500 for each station. If you’re staying at a hut, add another ¥10,000 – ¥13,500.
- Ziploc bags. Bring a couple of gallon Ziploc bags that come in handy to keep your valuables dry especially your electronic gadgets. These are also important because any trash you take up needs to come back down with you.
- Toilet paper. Not every public restroom is well-stocked at all times. And, in the unfortunate situation where you have no public restroom to use (a bad day considering the number of other climbers), it’s best to have some handy.
- A small towel. Use for wiping your sweat or drying your hands after using the toilet.
4. Other things to consider:
- Camera. Unless you’re a professional photographer commissioned to take photos of Mt Fuji, don’t bring your big heavy lenses and camera body here. Just use a compact camera like a mirrorless or your phone to take pictures.
- External battery for your phone. Batteries suffer and discharge faster in cold temperatures and mountain huts don’t generally allow you to charge your electronic devices, so don’t forget an extra battery or external battery pack on hand. Aside from allowing you to taking photos, being able to contact emergency services is important at all times.
- Balaclava or face cover. For sand, snow, and dust protection.
- Cards. For playing with your friends or other guests inside a mountain hut.
- Extra socks and shirts. If you’d like to change to the mountain hut.
- Toiletries. Just limit it to toothbrush and toothpaste. There are no shower or onsens (hot spring) at the huts in Mt. Fuji.
- First aid kit: You can build your own well-stock first-aid kit in a zip-lock bag or buy the entire kit but make sure to only carry essential items for mountain climbing. And don’t bring the bulky container that comes with it. Your first-aid kit should have gauze pads or sterile kit for minor cuts, medical tape, butterfly bandages, band-aids or adhesive bandages, disinfecting or antibiotic creams like Neosporin, over-the-counter pain medications and anti-diarrheal medication.
- Insurance. Read our Japan travel essentials for we recommend travel insurance for travel in Japan.
- Knee braces.
“I twisted my knee early on during my 2nd Fuji climb (remember that proverb?) and decided to finish the climb despite the intense pain because I forgot a knee brace to help alleviate some of the forces on my knees. Don’t be like me. Bring a brace or two to help if you know you have knee issues…”
~ shared by my husband.
What not to bring:
- Sleeping bags. If you will stay at a hut, they provide sleeping bags and blankets.
- Big heavy lenses and camera body. The weight can really add up. So only bring a compact or a mirrorless camera. If you have the latest version of GoPro, that’s a much better option since they’re now waterproof.
- Laptop or iPads. These devices are easily broken on Mt. Fuji’s extreme weather changing conditions and just adds to the weight. Leave them.
How to Prepare for your Climb
We suggest starting out small before tackling Fuji-san such as doing some pre-climb training or hiking smaller mountains a month before you climb Fuji-san.
Here are some pre-climb preparation recommendations:
- Cardiovascular exercises such as running or jogging.
- Upper and lower body strength training such as squatting and weight lifting.
- Trail running or Stairmaster workout.